So these are more or less notes for myself, I am starting study for the CCNA Voice exam and will be posting notes here as typing and reading are just two ways to reinforce the knowledge.
Loop start signaling – Is a process in which the end point connects the tip / ring connections together to complete the circuit.
Ground start signaling – A process in which a ground signal is sent to the CO to signal that an outgoing call is going to proceed. Typically used in a PBX.
Glare – When an end user picks up the phone at the same time as an incoming call, occurs with the use of loop start signaling.
Dual-tone multifrequency (DTMF) – The keys on the phone generates two tones a high and a low frequency. AKA tone dialing verses pulse.
Pulse dialing – a process in which the phone quickly connects and disconnects the local loop circuit wires, sending a series of “pulses” to the CO to designate what number is being pressed.
Pulse-amplitude modulation (PAM) – The process of sampling an analog waveform many times to determine numeric electric amplitude values. AKA the sampling process.
Quantization – Assigning numeric values to analog signals so they can be transported over a digital network.
Pulse-code modulation – The process in which the sample (PAM) value is converted into an 8-bit, binary number.
Time-division multiplexing (TDM) – By sending data in specific time slots multiple channels of voice or data can be sent over a single connection.
Channel associated signaling (CAS) – a T1 signaling type that uses a bit from each DS0 channel to send signaling information back to the CO. Also known as Robbed Bit Signaling.
Common channel signaling (CCS) – a T1 signaling type that uses a dedicated DS0 to send signaling information back to the CO.
Robbed Bit Signaling (RBS) – See CAS steals 8th bit on every 6th frame.
Super Frame SF – Sends groups of 12 T1 frames at a time. All bits are used for synchronizing the near and far end T1 equipment.
Extended Super Frame (ESF) – Sends groups of 24 T1 frames at a time. Of the 8000 bits per second 2000 are for synchronization, 2000 for error checking and 4000 for a supervisor channel which is capable of sending control functions and error reporting.
Q.931 – ISDN CSS signaling type.
Local loop – Link between customer premises and the telco provider.
Private Branch Exchange (PBX) – customer equipment that allows them to run a private voice network.
Key system – Allows a company to run a private voice network. Usually smaller than a PBX and provides a shared line appearance. (Some new key systems may provide unique extensions like a PBX)
Signaling System 7 (SS7) – A signaling type used in the telco network to provided inter-CO connectivity and call routing.
E.164 – The ITU standard for telephone numbers and used on the PSTN.
Tuesday, June 30, 2009


Tuesday, June 16, 2009
Lacerte Tax 2008 in Restricted User Environment
Those of you that have had the misfortune to have to work in IT and support Lacerte Tax know the pain that it causes. Not only is it written poorly from a Server – client standpoint but also as an application in general. However after much swearing and frustration I have figured out the security rights to grant so that you can keep a user at user level, and still be able to run Lacerte.
1. Install Lacerte from the network as an administrator on the machine. Make sure it works.
2. Open Windows Explorer and go to the C: drive.
3. Right Click the Lacerte folder and select properties.
4. Go to the Security Tab and select Users.
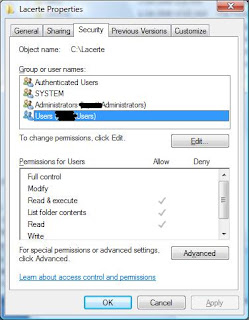
5. Grant them modify rights click apply and ok.
6. Go to C:\Windows you will want to grant users modify rights on the following files: W08Tax.ini, Lacerte.ini, WTAXSYNC.ini.
Please note for each year of Lacerte installed there should be a corresponding W(Year)Tax.ini file.
7. Go to Start > Run > Regedit.
8. Browse to HKLM > Software > Intuit
9. Right click the Intuit key and select Permissions.
10. Grant users Full Control over the key, click ok.
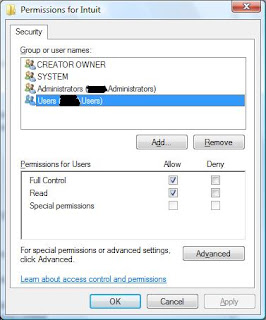
11. Right click the Lacerte key and select Permissions.
12. Grant users Full Control over the key, click ok.
*Note* Your domain users will need modify rights over the network locations where the Lacerte data is held as well.
That should do it, you should now be able to run Lacerte as a regular limited user without having to give up the keys to kingdom.
To Lacerte all I have to say is FIRE YOUR PROGRAMMERS. The amount you charge your customer base per year for your software and the lack of writing it for an enterprise environment is unforgivable. Your product is a pile of crap. I’d be more than happy to give you some ideas on how to improve it but something tells me I won’t hear from you.
1. Install Lacerte from the network as an administrator on the machine. Make sure it works.
2. Open Windows Explorer and go to the C: drive.
3. Right Click the Lacerte folder and select properties.
4. Go to the Security Tab and select Users.

5. Grant them modify rights click apply and ok.
6. Go to C:\Windows you will want to grant users modify rights on the following files: W08Tax.ini, Lacerte.ini, WTAXSYNC.ini.
Please note for each year of Lacerte installed there should be a corresponding W(Year)Tax.ini file.
7. Go to Start > Run > Regedit.
8. Browse to HKLM > Software > Intuit
9. Right click the Intuit key and select Permissions.
10. Grant users Full Control over the key, click ok.

11. Right click the Lacerte key and select Permissions.
12. Grant users Full Control over the key, click ok.
*Note* Your domain users will need modify rights over the network locations where the Lacerte data is held as well.
That should do it, you should now be able to run Lacerte as a regular limited user without having to give up the keys to kingdom.
To Lacerte all I have to say is FIRE YOUR PROGRAMMERS. The amount you charge your customer base per year for your software and the lack of writing it for an enterprise environment is unforgivable. Your product is a pile of crap. I’d be more than happy to give you some ideas on how to improve it but something tells me I won’t hear from you.
Friday, June 12, 2009
Applying CUCM Patches to CUCM 6.1
As we all know all software is broken from the day it ships. CUCM is no exception (Cisco Systems please don’t sue me I’m just stating a fact about bugs) so like all things there are patches. This will go over the process of getting the Patches and applying them to your CUCM server. You must have a valid CCO account and support agreement to legally follow this document.
Download the Update
1. Login to Cisco CCO.
2. Go to Support > Download Software *subject to change*
3. Voice and Unified Communications Software.
4. Use the new software delivery system.
5. Expand IP Telephony > Call Control > Cisco Unified Communication Manager (CallManager).
6. Click on Cisco Unified Communications Manager Version 6.1.
7. Click on Unified Communications Manager Updates.
8. In this case I’m going to select the latest release of 6.1(3b)SU1.
*WARNING* Now if you read the readme for 6.1(3b)SU1 which I highly recommend for all upgrades. You will notice that the upgrade path to 6.1(3b)SU1 is from 6.1.3x platform only. So if you are running 6.1.1 you will need to find the next upgrade before you can apply this one.
9. Go ahead and download the ISO file. I would recommend verifying the MD5 checksum to make sure there was no error in download. And Burn the disc.
Google md5sums it’s simple and allows you to drag and drop a file on it and it will calculate the MD5 hash for comparison on Cisco’s website.
Apply the Patch
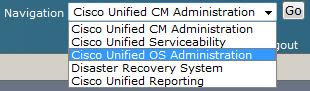
1. On your CUCM server go to Cisco Unified OS Administration.
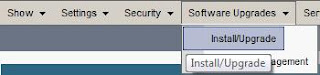
2. Go to Software Upgrades > Install/Upgrade.
3. We will be using the DVD/CD option that you burned. By the way it might be a good time to put this disc in the drive of the server you’re patching.
4. In Directory just put a / as the patches are on the root of the file system for the disc.
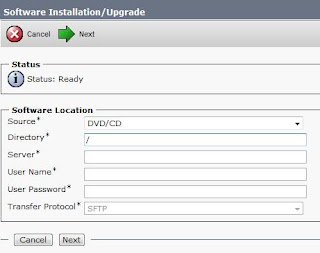
5. Click Next
6. It should now show the version available to upgrade. You can also select if you would like it to reboot the server once it is completed.
7. Click Next
8. You can now monitor the progress. Be advised this can take an hour + to complete. On my test CUCM server in a VM it took an hour and a half to patch with zero items in the DB. The more you have in your CMDB the longer this will take.
Kick back and watch the text scroll by. If all is well once this completes your server should restart and should reflect the new version on the logon page. This may also install new firmware for your phones so be advised they will all start updating as well. I would recommend blocking out a large segment of time for this upgrade depending on the size of your install.
Download the Update
1. Login to Cisco CCO.
2. Go to Support > Download Software *subject to change*
3. Voice and Unified Communications Software.
4. Use the new software delivery system.
5. Expand IP Telephony > Call Control > Cisco Unified Communication Manager (CallManager).
6. Click on Cisco Unified Communications Manager Version 6.1.
7. Click on Unified Communications Manager Updates.
8. In this case I’m going to select the latest release of 6.1(3b)SU1.
*WARNING* Now if you read the readme for 6.1(3b)SU1 which I highly recommend for all upgrades. You will notice that the upgrade path to 6.1(3b)SU1 is from 6.1.3x platform only. So if you are running 6.1.1 you will need to find the next upgrade before you can apply this one.
9. Go ahead and download the ISO file. I would recommend verifying the MD5 checksum to make sure there was no error in download. And Burn the disc.
Google md5sums it’s simple and allows you to drag and drop a file on it and it will calculate the MD5 hash for comparison on Cisco’s website.
Apply the Patch
1. On your CUCM server go to Cisco Unified OS Administration.

2. Go to Software Upgrades > Install/Upgrade.

3. We will be using the DVD/CD option that you burned. By the way it might be a good time to put this disc in the drive of the server you’re patching.
4. In Directory just put a / as the patches are on the root of the file system for the disc.

5. Click Next
6. It should now show the version available to upgrade. You can also select if you would like it to reboot the server once it is completed.
7. Click Next
8. You can now monitor the progress. Be advised this can take an hour + to complete. On my test CUCM server in a VM it took an hour and a half to patch with zero items in the DB. The more you have in your CMDB the longer this will take.
Kick back and watch the text scroll by. If all is well once this completes your server should restart and should reflect the new version on the logon page. This may also install new firmware for your phones so be advised they will all start updating as well. I would recommend blocking out a large segment of time for this upgrade depending on the size of your install.
Subscribe to:
Posts (Atom)