We are compiling a list of wants and needs for the upgrade. One feature we are playing with in development right now is LDAP integration. This will allow us to target a few specific OU (Organizational Units) in Active Directory for our region which our CUCM 6.1 servers will be supporting. This way we don’t end up with all 20k+ users in our CUCM database.
1. Make sure the Cisco DirSync service has been activated. Without this you’ll find all the settings in the world will yield you no users synchronized to the CMDB.
a) Go to Cisco Unified Serviceability.

b) Check Cisco DirSync and save.
c) Go back to Cisco Unified CM Administration.
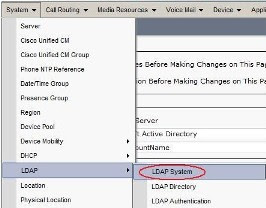
2. Go to the System Tab > LDAP > LDAP System Configuration.

3. Put a check in the Enable Synchronizing from LDAP Server box.
a) Select the appropriate LDAP Server Type and Attribute type. In our case the Type is Microsoft Active Directory and sAMAccountName is the User ID field
b) Click save.
4. Go to the System Tab > LDAP > LDAP Directory. This is where we will configure the DNs to search for user synchronization from Active Directory.
5. Click Add new.
6. Fill in the fields as follows.
a) LDAP Configuration Name = A logical name you give to this directory.
b) LDAP Manager Distinguished Name = An AD account with read rights to AD. I recommend creating a service account for this purpose.
c) LDAP Password = Password for that AD account.
d) Confirm Password = If I have to explain stop now.
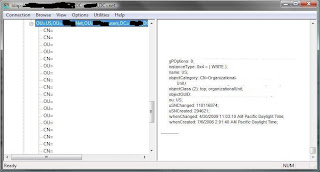
e) LDAP User Search Base = This is the LDAP DN for where you want CUCM to search for users. The easiest way to find this is to get LDP.exe from Microsoft and take the following steps.
i. Launch LDP.exe
ii. Click Connection > Connect. Leave the box blank and it will bind to your current AD domain assuming the machine you are using is in the Forest / Domain you want CUCM to reference. Click ok.
iii. Click Connection > Bind. You should be able to use the default of the currently logged in user. In most organizations all users have read rights to AD.
iv. Click View > Tree. The BaseDN would be the simplest form of your domain so blah.net. Click Ok.
v. You should now have a tree on the left hand side and should be able to browse to the OU containing the users you want CUCM to add to the database for you.
vi. Once you locate the OU right click it and click Copy DN. This will copy the full DN making for simple copy and paste delight over in CUCM.

f) Paste the DN into the LDAP User Search Base.
7. Setup your schedule for how often you want CUCM to sync from Active Directory. Dependent on changes made per day this could be once a day up to every couple hours if a lot of changes are made. Biggest thing to avoid would be large syncs during business hours as this may put additional load on the CUCM cluster.
8. Setup what fields you want to map. In our case the defaults were fine.
9. Finally put in the DNS or IP address of your Domain Controller. As to if it’s using point 389 or the SSL port is between you and your AD team. I highly recommend adding redundant Domain Controllers this way should the first fail the CUCM server will still be able to perform scheduled syncs.
10. Click Perform Full Sync Now to kick off the first sync it may take a while however you should eventually see people show up under User Management > End Users.
11. Ok so now we have people in the directory right? Well now we need to tell CUCM to use the LDAP server (Active Directory) to authenticate them.
12. Go to System > LDAP > LDAP Authentication.
13. Check the Use LDAP Authentication for End Users box.
14. In the LDAP Manager Distinguished Name field this again is our service account to read against AD.
15. In the LDAP Password field put the password of said service account.
16. Confirm Password again if I have to explain I don’t know how you even got this far.
17. LDAP User Search Base. This is a little different instead of specifying all the way down the OU level for our LDAP DN we will want to specify the root of the forest. This way any valid user regardless of if they get moved should be able to authenticate. e.g DC=company,DC=net
18. Next fill in the same domain controllers and settings you used for the previous step. Again I stress resiliency here is your friend, unless you like having to work weekends and nights then by all means shun fault tolerance.
19. Click save.
Time to give it a spin. Go to the IP address of your CUCM server / ccmuser. e.g. https://10.20.6.157/ccmuser/ You should be able to login with your AD username and password.
So hopefully you are able to login. Now the unfun part. Each end user needs to be associated to a device so that they can take full advantage of this. I will follow up with another document on how to bulk make these associations unless you want the pain of matching people up to phones.
No comments:
Post a Comment