Showing posts with label CUCM. Show all posts

Thursday, December 13, 2012

Exchange 2010 Blind Transfer


Scenario

Edward executive admin answers the phone for Edna executive. This is setup in CUCM so that Edward
has two line appearances. His x1000, and then Edna’s on his second line button x1001. When someone
calls Edna both her and Edward’s phones ring. Occasionally Edward would answer Edna’s line and the
caller would ask to be transferred to her voicemail. Under the Unity voicemail system this was not a
problem Edward would press transfer on his phone dial *1001 and then transfer again to connect the
caller to Edna’s voicemail greeting, the caller would leave a message and all was well with the world.

Problem

With Exchange UM this was not the case. When Edward would dial *1001 from Edna’s line he would be
greeted with the user PIN prompt as if he was trying to check Edna’s voicemail. As we know Exchange
UM relies on the SIP diversion header information to know who the call is from. In this case the call
appeared to be from Edna meaning Exchange UM assumes that Edna is trying to check voicemail so play
the login greeting.

Solution

The root cause of the problem is the default settings on the SIP trunk going from CUCM to Exchange
UM. On the Outbound Calls section, Calling Party Selection this is defaulted to Originator. Meaning the
directory number sent in the diversion header to Exchange is going to be the first call leg in the transfer,
in the above example this would be Edna’s directory number.
Changing this setting to Last Redirect Number results in the last device to be connected to the call leg
having its caller ID used in the diversion header. In this example that would be the caller that is currently
being transferred to Edna’s voicemail. This results in the desired behavior of the caller being prompted
to leave a voice message for Edna.


HOWEVER this then means that during a normal call no answer scenario the last device connected in the
call leg is Edna’s phone which brings us back to where we started. The user would be greeted with the
login prompt for voicemail and not the option to leave one. This is resolvable however by creating a
special trunk used only for blind forwarding. The blind forwarding trunk will have its Calling Party
selection set to Last Redirect Number. While the normal voicemail trunks will be set to Originator
solving both use case needs. This also requires the creation of a separate voicemail pilot number to be
created so it can be pointed at this specific blind forward trunk.

Summary

Normal Voicemail Trunk


Blind Forward Trunk


Saturday, October 27, 2012

CUCM SQL Magic (well really just queries) - Part 2

So last time we figured out how to read from the CUCM DB directly using SQL statements. This time we're going to start changing things. So like last time I recommend you take a backup and don't do anything you think could end in creating a fissure in the space time continuum.

Last time we learned that DN 1234 had a voice mail profile of 16c584ea-6a81-4138-9ea1-af452de8f75a. But maybe we want to change this, to say no voice mail. We learned that this had a PKID of NoVoiceMail 00000000-1111-0000-0000-000000000000. So we just need to update the DN to reflect this. With an easy SQL statement.


run sql update numplan set fkvoicemessagingprofile = '00000000-1111-0000-0000-000000000000' where dnorpattern = '1234'

What we've said above is update the numplan table and set the fkvoicemessagingprofile field to the value 00000000-1111-0000-0000-000000000000 where the DN is 1234. If all is well you should get the following output:

Rows: 1

Meaning that 1 row in the table was updated. If you go and check in the GUI your new voice mail profile change is reflected. Now it would be easy to break this into a nice long excel document output that in plane text and you're a copy paste away from easy DB updates that you otherwise couldn't do in the GUI.

Wednesday, October 24, 2012

CUCM SQL Magic (well really just queries) - Part 1

Have you ever been trying to do a mass edit of some sort in CUCM and realized that the field or way you wanted to do it wasn't available to you via the Bulk Administration menu. Or more aptly like me today "Are you @#$@ing kidding me Cisco you are epic fail!". Well then you're in luck my suffering is your gain.

The Resources
The Data Dictionary
In order to work with the CUCM DB one must know thy enemy. That's where the data dictionaries come in. If you go to Cisco.com and do a search for "Data Dictionary" you'll come up with a list of hits select the data dictionary that applies closest to your version of CUCM. Each version of CUCM does not come with data dictionary only when the Devs decide to make schema changes do you get a new one. The horribly created PDF lists each table in the CUCM DB and each column in it. With descriptions of what, who, blah blah.

SQL Cheat Sheet
If you're also like me knowing SQL is near the bottom of things I'd like to know. I'm not a programmer I'm a hack programmer. I can take something rip it apart and hope for the best. That being the case I can't remember SQL syntax from Expect syntax to PHP to HTML, so on so forth and god only knows how many other things are floating around in my brain.

So why know when I can cheat. After all it's not about knowing the answers it's about knowing where to find them. The following site is a nice condensed command reference for SQL which we'll need as CUCM uses a SQL to Informix interrupter.
http://www.sql-tutorial.net/SQL-Cheat-Sheet.pdf

The Task
Look don't touch
Now I highly recommend before you go mucking about in your CUCM DB you 1) take a backup. You might BREAK THE WORLD. 2) Why not look around before we go hacking off limbs willy nilly. So with that in mind lets use the following example.

Find a users voicemail profile based on assigned DN. Example DN = 1234

  1.  Login to the CUCM publisher via SSH. (if you don't know what I'm talking about this whole blog post isn't for you probably)
  2. Build our query - the syntax in the CLI is as follows: run sql
  3. So in our case we want to find the voicemail profile on lines that have DN 1234 assigned. So our statement would be:
    run sql select fkvoicemessagingprofile from numplan where dnorpattern = '1234'
admin:run sql select fkvoicemessagingprofile from numplan where dnorpattern = '1234'
fkvoicemessagingprofile            
====================================
16c584ea-6a81-4138-9ea1-af452de8f75a 
What we've said above is show me (select) the field fkvoicemessagingprofile from the numplan table, where the DN (dnorpattern) is equal to 1234.

This returned the system unique identifier for the lines voicemail profile. But that's not too helpful unless you happened to remember each ID in the system. But we can look this up with another query. Instead of just looking up one lets get a list of all of them in the system. The statement would be:
run sql select name,pkid from voicemessagingprofile where pkid like '%'

admin:run sql select name,pkid from voicemessagingprofile where pkid like '%'
name        pkid                              
=========== ====================================
Default     16c584ea-6a81-4138-9ea1-af452de8f75a
NoVoiceMail 00000000-1111-0000-0000-000000000000
What we can see is above we've said. select the fields Name and PKID(unique system identifier) from the voicemessagingprofile table where the PKID is like %. If you look up SQL operators you'll learn that % is a wildcard meaning one or more characters so anything really.

What we've learned here is our number above is assigned the default voicemail profile. as the PKID matches.

Part two will cover how we change this via the CLI. Stay tuned.... Part 2

Friday, June 12, 2009

Applying CUCM Patches to CUCM 6.1

As we all know all software is broken from the day it ships. CUCM is no exception (Cisco Systems please don’t sue me I’m just stating a fact about bugs) so like all things there are patches. This will go over the process of getting the Patches and applying them to your CUCM server. You must have a valid CCO account and support agreement to legally follow this document.

Download the Update
1. Login to Cisco CCO.
2. Go to Support > Download Software *subject to change*
3. Voice and Unified Communications Software.
4. Use the new software delivery system.
5. Expand IP Telephony > Call Control > Cisco Unified Communication Manager (CallManager).
6. Click on Cisco Unified Communications Manager Version 6.1.
7. Click on Unified Communications Manager Updates.
8. In this case I’m going to select the latest release of 6.1(3b)SU1.

*WARNING* Now if you read the readme for 6.1(3b)SU1 which I highly recommend for all upgrades. You will notice that the upgrade path to 6.1(3b)SU1 is from 6.1.3x platform only. So if you are running 6.1.1 you will need to find the next upgrade before you can apply this one.

9. Go ahead and download the ISO file. I would recommend verifying the MD5 checksum to make sure there was no error in download. And Burn the disc.

Google md5sums it’s simple and allows you to drag and drop a file on it and it will calculate the MD5 hash for comparison on Cisco’s website.

Apply the Patch
1. On your CUCM server go to Cisco Unified OS Administration.


2. Go to Software Upgrades > Install/Upgrade.


3. We will be using the DVD/CD option that you burned. By the way it might be a good time to put this disc in the drive of the server you’re patching.
4. In Directory just put a / as the patches are on the root of the file system for the disc.


5. Click Next
6. It should now show the version available to upgrade. You can also select if you would like it to reboot the server once it is completed.
7. Click Next
8. You can now monitor the progress. Be advised this can take an hour + to complete. On my test CUCM server in a VM it took an hour and a half to patch with zero items in the DB. The more you have in your CMDB the longer this will take.

Kick back and watch the text scroll by. If all is well once this completes your server should restart and should reflect the new version on the logon page. This may also install new firmware for your phones so be advised they will all start updating as well. I would recommend blocking out a large segment of time for this upgrade depending on the size of your install.

Thursday, June 11, 2009

Implementing Extension Mobility

So a feature we have decided to implement with our upgrade for all of our phone users is extension mobility. What extension mobility allows a person to do is hit services on the phone entire their username and a pin and then that phone pulls all of their information from the CUCM cluster and becomes their extension. This means they no longer have to take their phones with them when they move desks, merely sit down enter their info and bam the phone is theirs.

There are a few steps to accomplish this task. We must first enable the service. Tweak a setting in the service parameters. Setup the extension mobility service. Create the virtual phone device profiles. In reality they are just device profiles but I find calling them virtual phone device profiles helps with the understanding of what they really are. And finally subscribe physical and virtual phones along with end users to the service and profiles.

With the explanation out of the way let’s get started. Wait, wait, there is one more point to bring up. We have a choice to make or namely you have a choice to make.

There are two ways to implement extension mobility. You can do it on a per user basis so everyone has a normal configured phone. But a few select people say VP, C level people have the mobility feature. This is how we did it at my last employer. The other option the one we are going with here is no one specifically has a phone assigned to them. Everyone will get an extension mobility profile and then log into their phone wherever they are sitting. The advantage for us is with all the office moves changes etc, no one will have to wait for IT to either re-program or move their phone. The configuration however is the same it’s just a matter of will you be making a handful of extension mobility profiles or a lot. And will you be associating physical phones to people or not. (Hint the bulk editor is your friend.)


Enable Extension Mobility
1. Go to Cisco Unified Serviceability.


2. Tools > Service Activation.
3. Put a check in the Cisco Extension Mobility box and click save.

Adjust Service Parameters
1. Go to Cisco Unified CM Administration.
2. System > Service Parameters


3. Select your server from the drop down list. If you have a cluster, select your publisher.
4. Select Cisco Extension Mobility (Active)
5. Under Multiple Login Behavior change this from Multiple Logins Not Allowed to Auto Logout. This way should a user forget to logout and want to login somewhere else they will be automatically logged out on the other phone.
6. Click Save.


Create Extension Mobility Service
1. Go to Device > Device Settings > Phone Services.


2. Click Add New.
3. Service Name = Extension Mobility
4. ASCII Service Name = What you want to display on phone. I used Extension Mobility.
5. Service Description = What you want explaining the service in CUCM. I again used Extension Mobility.
6. Service URL = http://(IP of CallManager):8080/emapp/EMAppServlet?device=#DEVICENAME#
7. Click Save.

Create Device Profile
1. Go to Device > Device Settings > Device Profile.


2. Click Add New.
3. Select the phone model that this user will be using and click next.
You notice this looks like a stripped down version of the phone template.
4. Fill out the fields as applicable. Under device profile name make sure you note the users name or login for future identification as this will be their phone for all extensive purposes.
5. Click Save.


You should now be at a screen remarkably familiar to a phone configuration. This again is why I call them virtual device profiles. We are programming a phone it’s just associated to a user instead of a MAC address.
6. Click on Line one and add your DN as your normally would.
7. Click Save once you are done adding your DN.
We have now created the virtual phone profile AKA Device Profile. Now we need to associate it to our user and subscribe the service to the phone and user.

Subscribe Phones and End Users to Extension Mobility Service
1. Go to Device > Phone.
2. Pick a phone you want to work with.
3. Scroll down to the Extension Information section.
4. Check the Enable Extension Mobility box.


5. Click Save.
6. Go to User Management > End User
7. Pick a user you want to work with.
8. In the Extension Mobility section select the device profile you created for this user. Move it down into the Controlled Profiles.


We have the user now associated to his profile. Now we must subscribe both the physical and virtual phone to the extension mobility service. This may seem confusing as we already enabled it. Correct we enabled the service on the phone and user but we didn’t give an entry point to the user to get to the service. That is what subscribing is for. This will enable the service to show up when the user hits the services button on their phone.
9. Go to Device > Phone.
10. Select your phone you’re working with.
11. In the related links drop down select Subscribe/Unsubscribe Services.


12. In the Select a Service drop down select Extension Mobility. This is the service we created earlier.
13. Click Next.
14. If you wanted to change the display name you could here but the defaults we setup should be fine. Click Subscribe.


15. Close this window.
Now you might think I’m done but you’d be wrong. Sure now you could go over to the phone and login as that user no problem. Now try to log out. What is that you say? You go to services and there aren’t any. Well of course not their virtual phone AKA Device Profile hasn’t been subscribed to the Extension Mobility service. Let’s fix that.
16. Go to Device > Device Settings > Device Profile.
17. Select the Device Profile you’re working with.
18. Under related links select Subscribe/Unsubscribe Services.
19. Run through the process of adding the Extension Mobility service same as we did for the physical phone.

That’s all there is to it. You should now be able to hit services on the phone when it’s in its blank state use your username and PIN. The phone should do a quick reset and bam it’s now that user. Now you just need to make umpteen however many device profiles for people.

Wednesday, June 10, 2009

Configure Cisco Unified Communications Manager (CUCM) to Authenticate End Users against Active Directory

A project you will be seeing many posts from. At work we are working to upgrade our Cisco Call manager from 4.1 to 6.1. This is a task I have done before however now with more focus and a little less hectic of a career I am going to take the opportunity to document the process.

We are compiling a list of wants and needs for the upgrade. One feature we are playing with in development right now is LDAP integration. This will allow us to target a few specific OU (Organizational Units) in Active Directory for our region which our CUCM 6.1 servers will be supporting. This way we don’t end up with all 20k+ users in our CUCM database.


1.    Make sure the Cisco DirSync service has been activated. Without this you’ll find all the settings in the world will yield you no users synchronized to the CMDB.

    a)    Go to Cisco Unified Serviceability.


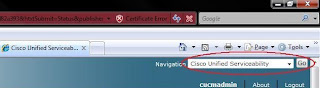
    b)    Check Cisco DirSync and save.
    c)    Go back to Cisco Unified CM Administration.

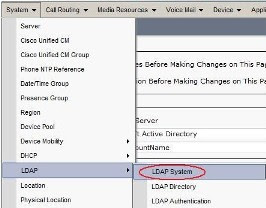
2.    Go to the System Tab > LDAP > LDAP System Configuration.


3.    Put a check in the Enable Synchronizing from LDAP Server box.
    a)    Select the appropriate LDAP Server Type and Attribute type. In our case the Type is Microsoft Active Directory and sAMAccountName is the User ID field
    b)    Click save.


4.    Go to the System Tab > LDAP > LDAP Directory. This is where we will configure the DNs to search for user synchronization from Active Directory.
5.    Click Add new.
6.    Fill in the fields as follows.
    a)    LDAP Configuration Name = A logical name you give to this directory.
    b)    LDAP Manager Distinguished Name = An AD account with read rights to AD. I recommend creating a service account for this purpose.
    c)    LDAP Password = Password for that AD account.
    d)    Confirm Password = If I have to explain stop now.
    e)    LDAP User Search Base = This is the LDAP DN for where you want CUCM to search for users. The easiest way to find this is to get LDP.exe from Microsoft and take the following steps.
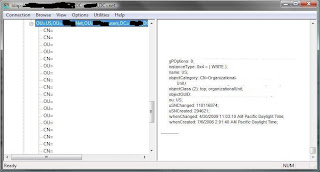
        i.    Launch LDP.exe
        ii.    Click Connection > Connect. Leave the box blank and it will bind to your current AD domain assuming the machine you are using is in the Forest / Domain you want CUCM to reference. Click ok.
        iii.    Click Connection > Bind. You should be able to use the default of the currently logged in user. In most organizations all users have read rights to AD.
        iv.    Click View > Tree. The BaseDN would be the simplest form of your domain so blah.net. Click Ok.
        v.    You should now have a tree on the left hand side and should be able to browse to the OU containing the users you want CUCM to add to the database for you.
        vi.    Once you locate the OU right click it and click Copy DN. This will copy the full DN making for simple copy and paste delight over in CUCM.


    f)    Paste the DN into the LDAP User Search Base.

7.    Setup your schedule for how often you want CUCM to sync from Active Directory. Dependent on changes made per day this could be once a day up to every couple hours if a lot of changes are made. Biggest thing to avoid would be large syncs during business hours as this may put additional load on the CUCM cluster.
8.    Setup what fields you want to map. In our case the defaults were fine.
9.    Finally put in the DNS or IP address of your Domain Controller. As to if it’s using point 389 or the SSL port is between you and your AD team. I highly recommend adding redundant Domain Controllers this way should the first fail the CUCM server will still be able to perform scheduled syncs.
10.    Click Perform Full Sync Now to kick off the first sync it may take a while however you should eventually see people show up under User Management > End Users.
11.    Ok so now we have people in the directory right? Well now we need to tell CUCM to use the LDAP server (Active Directory) to authenticate them.
12.    Go to System > LDAP > LDAP Authentication.
13.    Check the Use LDAP Authentication for End Users box.
14.    In the LDAP Manager Distinguished Name field this again is our service account to read against AD.
15.    In the LDAP Password field put the password of said service account.
16.    Confirm Password again if I have to explain I don’t know how you even got this far.
17.    LDAP User Search Base. This is a little different instead of specifying all the way down the OU level for our LDAP DN we will want to specify the root of the forest. This way any valid user regardless of if they get moved should be able to authenticate. e.g DC=company,DC=net
18.    Next fill in the same domain controllers and settings you used for the previous step. Again I stress resiliency here is your friend, unless you like having to work weekends and nights then by all means shun fault tolerance.
19.    Click save.


Time to give it a spin. Go to the IP address of your CUCM server / ccmuser. e.g. https://10.20.6.157/ccmuser/ You should be able to login with your AD username and password.


So hopefully you are able to login. Now the unfun part. Each end user needs to be associated to a device so that they can take full advantage of this. I will follow up with another document on how to bulk make these associations unless you want the pain of matching people up to phones.